Lab 3: Verification
Purpose
The layout of this lab is the same as the previous one, but the situation is reversed. Instead of having all the tests available and implemented already and filling in the SystemVerilog, the SystemVerilog is written and you will be implementing tests.
Testing, in the hardware world we call it “design verification”, is essential to ensuring that designs fulfill their intent. The options for repairing hardware that has already been fabricated are limited.
Background
In the Processor Design Team, design verification tests are regular C++
programs. If the program returns 0 from its main function, the test has
passed, if the program returns something non-zero, the test has failed.
The heart of a test is the model. The model is a simulation of the
device-under-test (DUT), synthesized from the SystemVerilog files which describe
it using a program known as verilator. You don’t need to worry about invoking
or using verilator directly, the toolchain does that for you.
The model is a C++ object, the public members of this object are the port list present on the SystemVerilog module. For example a module with the following port list:
module DUT(
    input [7:0] alpha;
    input [7:0] beta;

    output [15:0] gamma;
);
Will generate a model with the following public members:
struct VDUT {
  uint8_t alpha;
  uint8_t beta;

  uint16_t gamma;
};
When changing inputs, the outputs of the model can be evaluated using the
.eval() method. For example:
  VDUT model;
  model.alpha = 5;
  model.beta = 8;
  model.eval();

  // model.gamma will change
Setup
Fork the Lab Week 3 repo
to your personal Github account and complete the exercises in that repo. (For
design log purposes, this cloned repo will be the one you link to.) Write your
C++ test bench code in the C++ source code files located in the dv folder
of the repo.
The toolchain has already been setup for you for all the exercises. It uses techniques you have not been introduced to yet so don’t be concerned if you don’t understand all of it. You can build the simulations using the techniques from the Week 1 Onboarding Lab.
Exercise 1: Something Familiar
Write a test that verifies the module implements the following behavior. Test
all possible values of a and b for each operation.
| op | out |
|---|---|
| 0 | a ^ b |
| 1 | a << b |
| 2 | a % b |
| 3 | ~(a & b) |
Exercise 2: Reading Rainbow
Being able to read code is as important as being able to write it. For this exercise, assume that the module is correct. This test is being written to ensure that any future changes to the module do not change its external behavior.
Design a test that reasonably verifies the behavior of the Exercise2 module. Note that testing the entire space of possible states is likely not viable.
Make Note: What testing strategy did you adopt for this Exercise2? What decisions did you have to make and how did you come up with your answers?
Exercise 3: A Verification in Many Parts
The Exercise3 module follows the same schematic as in Lab 2:
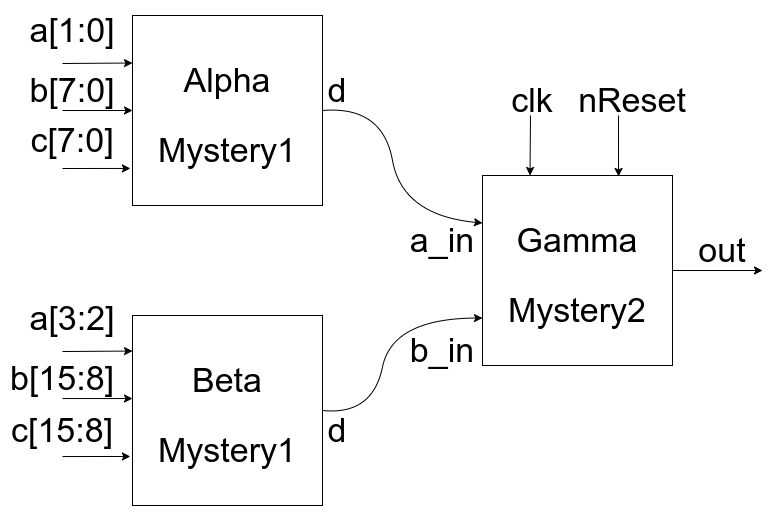
However, the mysteries have been changed. Mystery1 operates as follows:
- If
ais 0, thendis:
| Bits | 7:6 | 5:3 | 2:0 |
|---|---|---|---|
| Value | b’00 | b[2:0] | c[2:0] |
- If
ais 1, thendis:
| Bits | 7:6 | 5:3 | 2:0 |
|---|---|---|---|
| Value | b’01 | c[2:0] | b[2:0] |
-
If
ais 2, thendisb -
If
ais 3, thendisc
And Mystery2 operates according to the following rules:
-
Clocked on negative clock edge
-
When
resetis high, out is initialized to:
| Bits | 15:8 | 7:0 |
|---|---|---|
| Value | b_in | a_in |
- When
resetis low, the output cycles through the following states:
| State | Value |
|---|---|
| 0 | {a_in, out[7:0]} |
| 1 | {out[15:8], b_in} |
| 2 | {out[7:0], out[15:8]} |
| 3 | {out[3:0], out[7:4], out[11:8], out[15:12]} |
| 4 | {15’b0, ^out} |
Write a test that reasonably verifies the behavior of the module.
Exercise 4:
The Exercise4 module has the following behavior:
| cs | sel | out |
|---|---|---|
| 0 | X | 0 |
| 1 | 0 | alpha |
| 1 | 1 | beta |
| 1 | 2 | gamma |
| 1 | 3 | alpha & (beta | gamma) |
Write a test that reasonably verifies the behavior of the module.
Make Note: How does testing a Don’t Care work? What must be done to ensure the input truly has no effect on output?